Monthly Archives: December 2013

Organizing your “Undecorate” Process

 
Do you keep the holidays alive throughout the month of January, or have you already begun the holiday “un-decorate” process in your home? Whichever camp you fall in, it’s helpful to think about ways to make next year’s holiday decorating process a little easier on yourself. If you are the type that really dreads the process of holiday decorating, it’s particularly important that you store your holiday items in an organized manner in order to minimize the pain of decking the halls come next December.
 

I thought I’d share a few helpful tips to keep in mind as you begin the process of storing your holiday items for next year…
 

CREATE A DECORATING “CHEAT SHEET”

 
Before disassembling any of your holiday vignettes, be sure to take photos of them. These photos will enable you to easily replicate the vignette on your mantel, bookshelves, and table tops for next year if you don’t have the time or inclination to come up with new ways to display your holiday accessories.
 
Holiday Decorating Cheat Sheet1


I have a file folder named “Holiday Decorating” on my computer that I routinely refer to each November as I begin the process of decorating for the holidays. I typically like to mix things up from year to year. Occasionally, I’ll find my creative juices lacking and I’m thankful to have the photos to use as a “cheat sheet” for re-creating a tried-and-true vignette from a previous year.
 
Holiday Decorating Cheat Sheet 2


IMPLEMENT A STORAGE GAME PLAN


1. IDENTIFY & LABEL HOLIDAY BINS

 
Determine how you will identify your holiday bins among the vast collection of storage bins in your attic/basement. Will they all be a particular color? Right now, the major retailers have most of their bins on sale in a variety of colors for storing holiday décor.
 
Holiday Storage Bins


You will also need to determine how you will keep track of the contents of each bin. You basically have 2 choices: 1) label the contents on the bin itself (using a large label or the ever-popular duct tape/sharpie method), or 2) number the bins and create an inventory of the contents for each numbered bin. You can keep the inventory in your holiday planner/notebook or in a designated folder on your computer.
 

2. SELECT A STRATEGY FOR GROUPING DECOR

 
The way you group your items in storage bins should be determined by how you decorate your home for the holidays. Do you like to decorate with the same items and in the same location every year? If so, group your décor items by the location in which they are displayed (e.g., a “dining room” bin and a “fireplace” bin). If you like to mix it up each year, then it makes more sense to group like items (e.g., a “garland” bin and a “wreaths” bin).
 
Bonus tip: Create a “#1 Bin”, which contains the items that you need early on in the season. This can include items such as your advent calendar, the Elf on the Shelf, and holiday cookie cutters.
 

3. CHOOSE CONTAINERS WISELY

 
My final tip is to put some thought into the containers you choose for storing your holiday items. You will want to avoid stuffing your décor into ginormous 150 gallon bins (particularly if you are storing them in the attic!). If your containers are manageable, it will make the task of lugging them up from the basement each year less aversive.
 
Do you have a tip to share for making next year’s decorating process easier? I’d love to hear it.  Leave a comment below!
 

For more information about Natalie Gallagher and Refined Rooms, visit www.RefinedRoomsLLC.com.


Gift Wrap Solutions


Source

 
Here we are, 3 days before Christmas, and most of us are surrounded by stacks of gifts that are in need of wrapping. Perhaps this is the only time of year you find yourself knee-deep in wrapping paper rolls, gift tags, and bows. For many of us, we find ourselves frequently accessing the gift wrap supplies throughout the year for wrapping birthday gifts, hostess gifts, Mother’s and Father’s Day gifts and graduation gifts.
 
Whether you use gift wrap supplies regularly or once a year, having an organized storage solution in place for these supplies will enable you to complete the task of gift wrapping as painlessly as possible.  Here are some common types of solutions to consider if you on a mission to organize your gift wrap supplies this year…


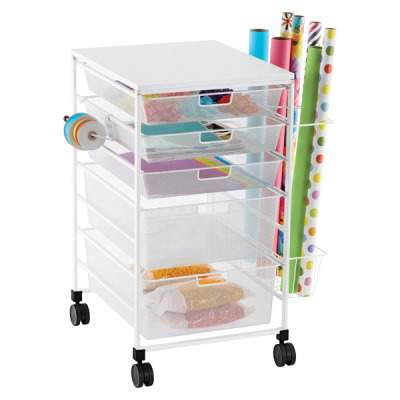
Rolling Carts


Source

 
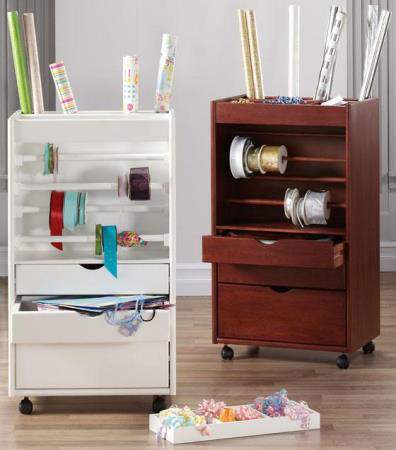
Storing your gift wrap and accessories in a rolling cart enables you to roll it out to the location you want to use it (in front of the t.v. is a great spot for completing a marathon wrapping session), and then easily store it back in a corner of your room or in your closet when not in use.


Source


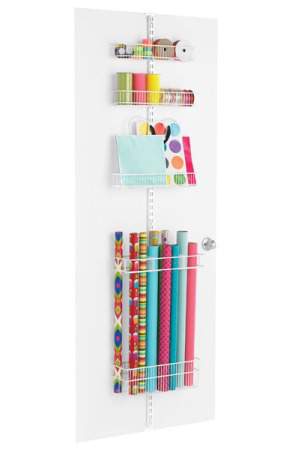
Vertical Storage Solutions

 
In previous blog posts, I’ve emphasized the importance utilizing vertical space  in your home to increase storage space, particularly the back of your doors.  Consider installing a door storage solution such as the one pictured below in a guest room, craft room, or even in your home office.
 

Source


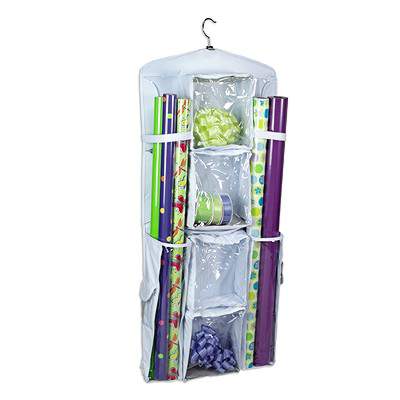
This hanging gift wrap storage station is another storage option that takes advantage of vertical space…within your closet. It offers the benefit of portability as well.


Source


Under-the-Bed Storage Solutions

 
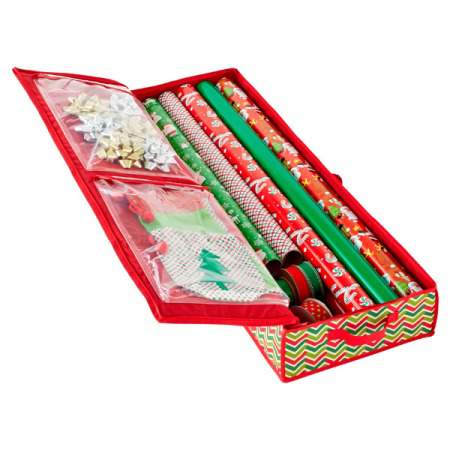
Another common place to stow away gift wrap materials is under the bed.  The shape of gift wrap rolls (small and long) make them great candidates for under-the-bed storage.  If this particular storage area of your home has been under-utilized, you may want to use an under-the-bed storage tote for corralling your rolls of gift wrap, as well as ribbon and gift tags.
 

Source

 
Have another storage solution that you love?  Please share by leaving a comment below.  Happy Wrapping!
 

To learn more about Natalie Gallagher and Refined Rooms LLC visit www.RefinedRoomsLLC.com.


Overcoming Holiday Overwhelm – Part 2


wreath2

 
In Part 1 of this series, I discussed the importance of setting realistic expectations and adopting a Zen attitude regarding the holiday season, as well as the importance of eliminating as many holiday obligations as possible. In Part 2, I outline 5 valuable tips for enhancing the joy and reducing the stress of the holiday season.
 

1. BEGIN PLANNING EARLY

 
Would it surprise you to hear that most of the holiday planning books and resources suggest that you begin the planning process in late September/early October? When you begin your planning well in advance of the official holiday season, it will enable you to spread out your massive To Do list into bite-size chunks. In addition, you will be able to identify tasks that can be completed well in advance, which frees up more time for relaxation and enjoyment as the holiday week draws near.
 

2. CREATE A MASTER HOLIDAY TO DO LIST AND CALENDAR

 
Begin the planning process by creating a Master Holiday To Do list, that outlines each task that you need to complete for the holidays and order them by the month in which the task needs to be completed. Be sure to consider the following broad categories when creating your To Do List:

Holiday Home Preparation – cleaning, decluttering, decorating;

Holiday Hosting – food shopping, menu planning, sending out invitations, cooking/baking;

Holiday Shopping/Gift Giving – budget, gift recipient list, gift ideas, shopping, gift wrapping, homemade gifts;

Holiday Traditions – family portrait, holiday cards, caroling, tree farm, religious events.

 
Once you’ve completed your To Do list, the next steps in your planning process are to 1) estimate how long each task will take to complete, 2) determine a start date and a deadline for each task, and 3) enter these dates into your holiday calendar.
 

3. CREATE A HOLIDAY PLANNING NOTEBOOK

 
christmas-planner
 
A holiday planning notebook is the most essential tool for maintaining your sanity this time of year. The planner should serve as the home for all information, resources, and planning tools you need to accomplish the tasks on your Master Holiday To Do List. In addition to your To Do List and calendar, the holiday planner should contain the following:  budget, gift list, party menus, holiday card recipient list, coupons, and receipts.
The notebook can be created using a variety of formats; I suggest using a 3-ring binder with page protector inserts to contain your papers. The good news is that there are several fabulous online resources for creating a holiday planning notebook so you don’t need to start from scratch! My favorite resources for free holiday planning printables are the Organized Christmas and Christmas Your Way websites. Both of these websites offer a holiday calendar and a master Holiday To Do list, as well as many other blank checklists, inventory sheets, and shopping lists. No need to reinvent the wheel, right?
 

4. USE HOLIDAY PLANNING APPS

 
holiday organizing app


If you prefer electronic over paper organizing solutions, there are a ton of holiday planning apps out there for you to explore. Some apps assist with managing your gift purchases/budget, while others assist with holiday meal/menu planning.
 

5. DELEGATE

 
A primary cause of holiday overwhelm is the belief that we have to complete all of the items on our Master Holiday To Do list ourselves. This year, I invite you to challenge that belief and explore ways to delegate the responsibility for some tasks to others. Have your kids stuff the holiday cards into the envelopes. Divvy up the gift shopping list between you and your spouse. If you are hosting a holiday dinner party, make it a “potluck” so that you are preparing only the main course instead of the entire dinner.
 
Alternatively, consider hiring professionals to outsource certain tasks (a handyman to install exterior lights, a professional cleaning service, a printing company to address and send out holiday cards). The small investment will pay you back tenfold in the form of reduced stress!
 
Do you have a favorite holiday planning tool, resource, or method? Leave a comment below. We’d love to hear about it!


Overcoming Holiday Overwhelm – Part 1

 
christmas_calendar
 
So here we are…December 1st. By now, many of us have been in Holiday Mode for several weeks. For a lot of people, the Magic of the Season has slowly devolved into a never-ending list of extra tasks and obligations that leave us feeling depleted and longing for January 2nd! We play the “How Many Holiday Activities Can I Commit Myself to Before Imploding?” game. We aspire to the Martha Stewart-esque décor and party spreads, as well as the Norman Rockwell-esque family get-togethers. Are you ready to stop the madness? “Yes, but how?” you ask. Here’s how…
 

Adjust your Expectations and Attitude

 
I know that it’s easier said than done, but we need to free ourselves from the unrealistic expectations of what we think we have to do this time of year and from our mind’s picture of what the holiday should “look like”. Be realistic about what you can accomplish with the limited time and energy that you have! Adopt a zen attitude this season…it won’t be perfect, you won’t be able to do everything, and that’s o.k.
 

Zen-Christmas2


Reduce Holiday Obligations

 
Begin your holiday season by making a list all of the activities that conjure up that “magical feeling” and bring you true joy. Next, make a list of all of the holiday activities that you typically do. The activities that are on list #2 and NOT list #1 are what I call Holiday Obligations. How many of these obligations might you be able to eliminate this holiday season? Focus on the ones that really deplete your energy.
 
When you realize that there really is no mandatory list of activities that we MUST do, you begin to feel very liberated! Is putting up exterior lights the bane of your existence? Nix it off the list. Despise attending the neighborhood holiday party? Say “no thank you” this year. Overwhelmed by the thought of getting Christmas cards out? Send an e-card or forego them altogether.
 
The holiday obligation I chose to remove from my list was having a live 12-foot high Christmas tree in our home. I love the experience of going to the tree farm and enjoy the fresh pine smell in my home. BUT… I have come to dread the task of hauling it in and out of the house, securing it to the wall, making sure it’s straight, putting on 1000+lights, and blinging it out to perfection (and making sure it’s watered each day).
 
Simplify Christmas1


Not this year!!! After surveying my family members and learning that all but one of us doesn’t mind the idea of a 7 foot artificial tree and won’t be devastated about missing our annual trip to the tree farm, we made the executive decision to nix the live tree (poor Hubby went kicking and screaming, but he’ll get over it).
 
I took it a step further and handed over the responsibility of decorating it to my 2 kiddos (adopting my Zen attitude). Does it look as fabulous as when I single-handedly spent an entire day painstakingly adorning it ? Not quite. Am I o.k. with that? Heck yea! Time is a valuable commodity in my life these days and I saved so much time by letting the kids take charge. Of course, they enjoyed the freedom of choosing the ornaments and placing them wherever they wanted without Mom rearranging them.
 
Simplify Christmas2
 
In Part 2, we will continue to explore concrete steps you can take to reduce stress and enhance your enjoyment of the holiday season.
 
Interested in learning more about how to Overcome Holiday Overwhelm? Join me on Wednesday, 12/4 from 6:30-7:30 p.m. at the Green branch of the Summit County Library at 4046 Massillon Rd, Uniontown, OH 44685 when I will speaking on this topic.
 

Interested in learning more about Natalie Gallagher or Refined Rooms?
Visit www.RefinedRoomsLLC.com